Image Map

Breakfast Bars | Oatmeal granola Bars | Chewy Energy Bar Recipe

This is one of my favorite breakfast/ snack bar, what I really like about this recipe is that you can play with the ingredients to make it your own. What other way to celebrate my 25'th post ~ this is a secret, keep it with you, ok! I am totally addicted to these bars and blogging :D. Thank you everyone for your support and kind words, they make my day. 
I have done this quite a few times and my husband and I love it. You don't need to use eggs/ butter to this recipe and its completely gluten free. I have used good sources of fiber and anti-oxidants to it so it also makes it healthy.

Don't worry if your bars don't turn up in the perfect square shape, Mine didn't :-) but you will never regret to how good they taste. I have done this couple of times

OATS BREAKFAST BAR RECIPE

Prep & cook time ~ 1hr 5 mins (baking 1hr)
Serves: Makes 16
Recipe Source ~ Nigella 


Ingredients 

1 x 397g can condensed milk
250g rolled oats (not instant)
75g shredded coconut
100g dried cranberries
125g mixed seeds (pumpkin/ sunflower/ sesame)
handful of walnuts

Method
  • Preheat the oven to 130°C/gas mark 1/2, and oil a 23 x 33 x 4cm baking tin, or use a throwaway foil one.
  • Warm the condensed milk in a large pan.
  • Meanwhile, mix together all the other ingredients and then add the warmed condensed milk, using a rubber or wooden spatula to fold and distribute.
  • Spread the mixture into the tin and press down with the spatula or, better still, your hands (wearing disposable vinyl gloves to stop you sticking), to even the surface.
  • Bake for 1 hour, then remove from the oven and, after about 15 minutes, cut into four across, and four down to make 16 chunky bars. Let cool completely.

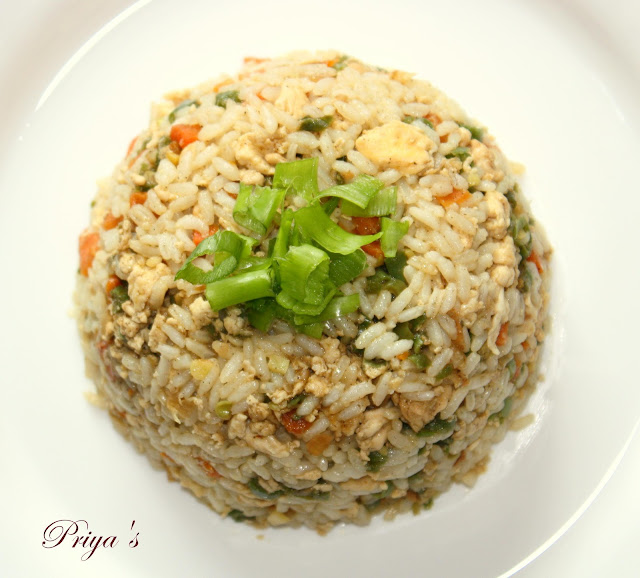
Chinese Chicken Fried Rice | Restaurant Style Chicken Fried Rice | Egg Fried Rice Recipe

My favorite from the Chinese cuisine. Brings back nostalgic memories, when I was young my brother & I used to crave for Chinese food and almost every time we used to go out for lunch/ dinner with our parents this is the dish we used to order. So much so my mom because of our great demand she used to make chicken fried rice at home. I really wonder how she put up with us... seriously!!! :-) we were such brats at home always fighting and especially me I used to jump on top of the bed so many times slight escape from hitting the ceiling fan... :P Most times amma used to tell us to get out of the house and lock the door and we still would not stop, we used to knock our neighbors to our rescue and ask them to call her... LOL good old days!!! 
About this dish - I can say its simple and easy if you make the rice and vegetable preparations before hand. I have also done a different fried rice from the Thai Cuisine - Thai Prawn Fried rice, do have a look at it. This rice can be accompanied by a Garlic chicken sauce, follow the links please.


CHINESE CHICKEN FRIED RICE RECIPE

Recipe Source ~ Own
Prep time ~ 20 mins
Cook time ~ 20 mins
Serves ~ 2

Ingredients 

Rice (basmathi/plain) - 1 cup
Water - 2 cup to boil (follow your own)
Boneless chicken - 200-300 gms (10-12 small pieces)
Egg - 2, beated
Carrots - 1 finely chopped
Beans - 10-12 finely chopped
Spring onion - 3 shoots, finely chopped
Soy sauce - 4 tbsp
Garlic - 3-4 pods, finely chopped
Pepper - 2 tsp (as per spice tolerance)
Salt- As per taste
Oil- for sauteing

Method
  • cook rice with water and cool down. Once it comes to room temperature, refrigerate it overnight (preferably) or for at least 4 hours
  • In a hot work add oil and once hot add the boneless chicken pieces and saute adding some salt and pepper for 5 minutes, close and cook for 2 minutes. Once cooked transfer it into a bowl 
  • In the same wok heat oil add the chopped garlic and saute for 20 secs don't let it turn brown, next add the shallots from the spring onion and saute.
  • Add in the vegetables and let it cook for 2 minutes with a closed lid, sauteing once or twice in between
  • Now add the chicken pieces and let it combine and cook for a minute, later add the soy sauce and pepper and mix well
  • Move the veg and chicken mix to one side of the wok and on the otherside add the beated eggs to be scrambled
  • Once the egg is well cooked combine everything and give it a good stir, now check for salt and taste, if needed add more salt/ soy sauce
  • Now add the rice slowly little by little and make sure there are no lumps in the rice
  • Once the rice and mixture is well combine sprinkle the spring onions and serve hot with garlic chicken


Pudina Rice Recipe | Quick Lunch Box Recipe | Variety Rice Recipe

My go-to recipe during weekdays is usually Pudina Rice. Tell me who does not like mint? Being Indians we usually have mint in the form of chutney's or dips. This flavored rice tastes , I usually pack lunch for my husband and this is one of them.

We pair the rice with either papads/ curd or simple pickle. I try to do variations to the dish by adding capsicum/ peas to it, which enhances the flavor.

MINT RICE RECIPE

Prep & cook time ~ 20 mins
Serves ~ 2
Recipe Source ~ Own

Ingredients 

Fresh mint leaves -  1/4 bunch
Green chilli - 1-2 depending on spice tolerance
Small onions - 8-10 chopped/ 1 medium onion sliced
Capsicum/ green peas - handful
Rice/ Basmathi rice - 1 cup
Water - 2 cup
Bay leaf - 1
Cardamom - 1-2 pods
Jeera - 1/4 tsp

Method
  • Boil the rice in a pressure cooker (follow your usual method), i had kept for 4 whistles and let it cool down
  • In a mixie blend the mint leaves, green chilli and onions into a fine paste.
  • In a hot pan add oil and put the whole spices once they release aroma add in the paste and the capsicum/peas and let it cook for 5 minutes
  • Once the mixture cools down combine it with the rice and mix well.

GARLIC CHICKEN RECIPE | CHINESE GARLIC CHICKEN SIDE

Since it was the weekend I wanted to make something special for lunch, hence I did my all time favorite chicken fried rice and garlic chicken. I had pre-cut all vegetables and prepared the rice before hand, so the mixing process was hassle free. 

This is a simple and easy recipe, I used basic Indian ingredients and sunflower oil. It has the sweet and spicy taste along with the punch of garlic. The chicken is marinated and shallow fried along with capsicum (red&green) and onions with a good sprinkle of spring onions that add more flavor to the dish.

GARLIC CHICKEN RECIPE

Prep & Cook time ~ 20 minutes
Recipe Source ~ Own

Ingredients

For marinate:
Chicken – 200 gms (boneless)
Red chili powder – 1 tsp
Corn flour powder – 1 tbsp
Salt – as per taste

For Sauce :
Capsicum – 100 g cubed (green & red)
Onion – 1 medium cubed
Garlic – 5-6 pods (finely chopped)
Spring onions – handful
Tomato ketch-up – 1 tbsp
Soy Sauce – 2 tbsp
¼ C water
1 ½ tsp corn flour – mixed with a little water
Salt – to taste
Oil Рfor saut̩ing & shallow frying chicken

Method

For Sauce~
  • Prepare the marinate and let the chicken sit in the marinate till the sauce is done
  • Now in a hot wok/ pan, heat oil and add the chopped garlic and let it fry for 20 sec, so not let it brown as it will not taste good
  • Add the onions and capsicum and let it sweat for a minute, then combine the tomato and soy sauce and mix well
  • Add ¼ cup water and let it boil for a little while
  • Now add in the corn flour paste (corn flour & water) and let it boil in medium flame for a minute
  • Check for salt and add accordingly (soy sauce in itself has salt)
For Fried Chicken ~
  • Prepare a deep vessel, once hot add in the oil (required for shallow fry)
  • Slow add the marinated chicken, let it cook well on each side for a minute and strain the excess oil and let it sit in a kitchen towel
  • Once all the chicken pieces are fried add the chicken to the sauce and let it cook for a minute
Serve hot with fried rice

Tips

-         If the sauce is too thick simple add little water to it
-         Always remember soy sauce has salt in it so balance salt accordingly
-         If you want the sauce to be more spicy add some red chilli flakes to the garlic while sautéing 

Cinnamon & Almond Loaf Cake | Snack Cake Recipe


I tried this loaf, after a long wait to get a loaf tin, it turned out super yummy and moist. I learnt that  Soured Cream keeps the sponge so moist. This loaf looks great when sliced. and if you prefer, you can substitute almonds with mixed fruits or nuts or your choice

If you are someone who loves cinnamon ~ cinnamon buns or cinnamon rolls you'd definitely love this one for sure. Its a great tea time snack with green tea/ chai :-)
Prep & cook time ~ 1hr 20 mins
Serves ~ 8-10
Recipe Source ~ Cake days

Ingredients

190 g unsalted butter, softened, if needed extra for greasing (I used parchment paper)
190 g plain flour, if needed extra for dusting
190 g caster sugar
3 eggs
1 tsp baking powder
1/4 tsp salt
25 ml soured cream
1 tsp vanilla essence
1 tbsp ground cinnamon
70 g almonds

Method 
  • Pre-heat oven 170C/ 325 F, Gas mark 3, then grease the loaf with butter and dust with flour or simple cut out parchment paper to line the inside of the loaf tin
  • Using a hand-held electric whisk cream together the butter and sugar until pale and fluffy. Break the eggs one at a time, mixing well after each addition and scraping down the sides of the bowl to make sure all the ingredients are fully incorporated
  • Sift together the flour, baking powder and salt, then add to the batter in two batches and mix on a low speed until just incorporated. Finally, mix in the soured cream and vanilla essence
  • Spoon about 200g of the batter into a small bowl an stir in the cinnamon. Srir the almonds/ raisins into the remaining batter, then por this batter into the prepared loaf tin. Spoon the cinnamon batter on top and swirl the two together for a marbled effect.
  • Bake the loaf in the oven for 50-60 mins or until the sponge feels firm on top and a skewer inserted into the center of the loaf comes out clean of any uncooked batter. Allow the loaf to cool a little before turning it out of the tin on to a wire rack to cool completely before you serve.

Carrot Chutney ~ a sweet & tangy, healthy treat!

Today being a Saturday, we had a long day out and when we were back home we were really tired and like always I wasn't sure about what to cook for dinner. Long story short I had some dosa batter left and wanted to make some chutney that wasn't coconut based. I quickly remembered this carrot chutney which I had done long long ago. So quickly went to do it, to tell you this is the most simple & healthy chutney and its filled with goodness. The sweetness of the carrot with a tangy from the tamarind and spice from the chilli make it a perfect accompaniment for a plain dosa dish.

Kids and elders will love it and a great way to bless our body with a vegetable filled with goodness. Its a must try one and I hope you love it as much as it do. I am sure that this recipe is for keepers!!! I am linking this to hearth & soul blog hop.
Cooking & Prep time ~ 15 mins
Serves ~ 2 
Recipe Source ~ Own

Ingredients 

1 cup chopped carrots 
1 tsp thick tamarind paste
1 green/red chilli (i used green)
5-6 curry leaves
1 tsp oil
Salt- as per taste

Method 

In a hot pan, heat oil and add carrots, green chilli and let it cook for 3 minutes, add the tamarind paste and curry leaves and cook for another 2 mins with a closed lid
Once its cooked, add salt and let it cook down for 5 minutes 
Then grind in a mixie into a fine paste

Serve along with idly or dosa

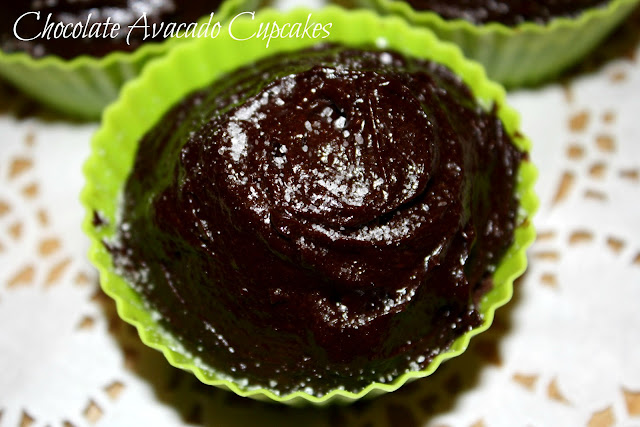
Avocado Chocolate Cupcakes (Vegan) ~ Eggless & Butterless Baking ;-)


Last week I had got some good avocados in a local supermarket and I wanted to try something different with them. Though this fruit is tasteless I started liking them for their nutritional value. 


Did you know ?

Avocados are
- Vitamin E powerhouse
- Aid in nutrient absorption 
- Lower cholesterol
- improve heart health & reduce stroke
- help in eye health
- acts as a oral cancer defense & prevents breast cancer


Now if you are someone who does not like this fruit like my husband, does this not change you perception towards them?

As I have never used this green fruit in baking, I was on the look out for a good recipe and stumbled upon Ria's blog and got the recipe, tried it out and turned great. 

To tell you more about the taste - I'd say that the chocolate almost overpowers the avocado and so even if you give this cupcake to someone who does not like this fruit they will not find out. My husband on the other hand ate it without a fuss. Like I mentioned in the title this is a butterless and eggless recipe. I am linking this to hearth & soul blog hop.


FOR THE CUPCAKES
Recipe Source - Joy the Baker Cookbook

Ingredients

1/2 Avacado
1 C Flour
1 C Sugar
1/4 C Coco Powder
1/2 baking powder
1/2 baking soda
2 tbsp oil (flavorless)
1 tsp almond/ vanilla essence
1 tbsp vinegar
1 C water

Method

-Preheat oven to 350 F/ 180 C and line a muffin tin/ silicon liners
- In a bowl mix all the dry ingredients, better to sieve them thrice - flour, coco, baking powder and baking soda (except sugar)
- In a large bowl mix all the wet ingredients - mashed avocado, oil, vinegar, essence, sugar and water
- Now combine the wet to the dry and fold gently (better to strain the wet, to remove lumps of avocado), need not over do this. Cupcakes taste good with less mixing
- In a ice cream scoop fill up the muffin tins and bake for 20 minutes


FOR THE AVOCADO CHOCOLATE FROSTING
Recipe Source ~ not quite Betty Crocker

This is the most simplest frosting that I ever did

Ingredients

1/4 C Coco
1/2 avocado
50 g sugar
1-2 tsp vanilla/ almond essence

Mix all the ingredients in a mixie or handheld blender, the mixture could be thick so it needs lot of blending.

I used a spatula and smeared it over the cupcake and sprinkled some sugar on top, you could use what ever topping you wish.

Soft & Easy Coconut Macaroons ~ a coco-nutty love affair


Today was a dull day for me and I was so clueless what to do. From morning I was in a not so good mood, well lets not talk about it.. Past few days my hubby had been asking me to make Coconut 
Burfi and I was keeping this in mind but felt like trying something different (sometimes want things my way). I also wanted something that will be simple and take less time (asking too much), my quest ended up in this ~ Soft & easy Coconut Recipe. They are the most yummy and delicate darlings that one can taste. So much so my hubby came after work and was totally surprised and truly loved it


I remember back in India we used to get coconut macaroons in ‘old-fashioned bakeries’, where they used to make these fat chunky coconut biscuits that were hard to chew and you can literally feel the chunky coconut bits (which I totally dislike). Let me tell you that these are not so, they are little firm on the outside and soft in the inside. If you are someone who loves the chocolate Bounty or any other coconut based chocolate you will definitely love this one.


Prep & cook time ~ 25 mins
Makes ~ 12-15 small macaroons
Recipe Source ~ food.com, slightly adapted to my own

Ingredients 

Fine desiccated coconut - 2 2/3 Cup
All purpose flour/ Maida - 1/4 C
Sugar - 2/3 C
Salt - 1/4 tsp
Egg whites - 4
Almond Extract - 1 tsp (this gives a lovely smell & taste)

Method

- Pre-heat oven to 180C/325 F
- Add the flour, sugar and desiccated coconut in a mixing bowl
- In another bowl beat the egg whites and almond essence until its smooth and combined
- Add the wet ingredients to the dry one little by little, use a wooden spoon and mix well
- In a baking tray add parchment paper and start spooning the mixture and drop 1 tsp at a time to form small cone shape
- Bake for 20 minutes until golden brown

Tips & Tricks 

Never put more than 1 tsp as they taste great when they are small

Thai Prawn Fried Rice ~ for the spicy couple ;-)


My husband and I love Thai food, and once we moved to London we were craving for a good Thai restaurant and in the process of doing so, I came across a similar recipe in  a cook show on TV. And guess what that evening planned to surprise him and it was a winner. The presentation is equally important and anyone can give it a go, it will definitely be a sweet surprise for the person you are cooking this for. I did not make any sauce or curry to go with it since the rice had enough spice.


Ingredients I used :


Serves approx 2 people
Prawns - 300 gms (cleaned, de-veined, medium sized)
Spring onions - 1 bunch
Garlic - mince of 8-10 pods
Onion - 1 medium sized
Red chilli flakes - 1 tsp
Light soy sauce - 2 tsp
Red chilli powder - 1/4 tsp
Egg - 2 for scramble
Rice - 1 cup (preferably basmati/ long grain rice)
Oil - 3 tsp


How I did it :


Rice - The rice is the most important ingredient for this dish, hence it has to be done the right way, boil the rice so that it is cooked well and not mushy. Like you see in the picture, where the rice grains are separated well. I usually use the cooker to boil rice and  I let it cook for 4 whistles. Once this is done let it cool down to room temperature and pack it in a container and refrigeration it for at least 5 hours or best if it stays overnight. Usually I cook the rice in the morning, freeze it for cooking later in the evening. Remember you need not add salt or anything else while boiling the rice


1. In a hot wok/ pan heat the oil and add the garlic along with the prawns and onions, give it a good stir and let it cook for 3 minutes, add a bit of salt to this.
2. add the red chilli powder, soy sauce, red chilli flakes and stir well.
3. once this is done, now move this mixture to one end of the pan/wok and on the other end add the beat eggs with salt and scramble them, mix it all together.
4. now add the rice and spring onions give it a good stir and let it cook for 4-5 minutes.
5. serve hot


For Rice setting :


Take a small cup/ bowl dab little oil in it and grease the inside completely. to this fill the rice in the cup and press it inside so that the rice it fully packed in the bowl. Now reverse the contents of the bowl on the serving plate. Place 2 prawn pieces on top of the rice mold to give it a restaurant effect. You could even serve it with some vegetables in the side.


Tip -


- the rice needs to be cooked and refrigerated prior to doing the dish.
- soy sauce is usually salted hence watch with the salt
- you could even add some vegetables to this dish, do as you pleace

Banana Date Cake/ Loaf ~ baking for beginners


Last night I tried out the Banana Date cake and to be honest it came out really well. My husband was surprised and happy at how it turned out, he gave it a 5* :-). Its a good recipe to try out if you are a beginner at baking. 

If you are a beginner in baking it a must do recipe. You could also use a loaf tin to bake it, the choice is yours.

Simple, easy and with ingredients available in anyone's pantry. So what are you waiting for? 

Recipe Source ~ Nags (modified using dates)

Ingredients needed :

1-2 ripe yellow banana (I used 2 since the bananas were quite small)
2 eggs
1/4 cup white powdered sugar
1/2 cup unsalted butter
1 cup white flour/ maida 
1 tsp vanilla essence
Couple of dates (you can use any nuts or raisins, depending on what you like)


Method

  • Keep the butter out in room temperature and mash the bananas in a separate bowl, just before you start beating the ingredients. 
  • Beat the sugar and butter such that the sugar entirely dissolves in the butter. 
  • Add the 2 eggs and whisk till the two combine.
  • Add the banana mash and beat in low setting until all the lumps disappear
  • Now add the vanilla essence and the white flour, combine using a wooden spoon, do not whisk at this point and later add the dates/ any nut of your choice.
  • Later set it in a greased cake tin and put it on a preheated oven for 180 degree/ fan grill for 40-45 mins until a skewer inserted in center comes clean.
  • Once done take the cake pan and place it on a cooling rack for 10 mins with the pan. Later flip the cake and let it cool down to room temperature. 
  • Slice into pieces and enjoy the cake.

Notes 

- Powder the sugar and then measure,  sugar can be adjusted based on the sweetness of the banana
- Always sieve the flour before adding to the whisked mixture, while sieving add a pinch of salt
- While setting the mixture in a cake tin, tap it a couple of times so that there is no air pockets in the cake

Easy Egg Puffs using read-made puff pastry~ anyone can do this


I tried out this recipe after a chat with one of my Indian friend. Got my own idea and did it, trust me it was so easy, a great evening snack without much work to do. You can do variations of this with different patties inside - some suggestions would be chicken, veg, potato or just onions with tomato.

Ingredients  I used:

Ready-made puff pastry, I used jus-rol puff pasty (they are amazing and lightly salted, which is perfect)Jus-rol
1 or 2 eggs
1 onion
1 tsp oil
1/4 tsp pepper
1/4 tsp turmeric (optional)
pinch of salt

How I did it:

1. Defrost the puff pastry for 20 mins or depending on the instructions given in the pack
2. boil the egg for approximately 10 mins
3. Pre-heat Oven and start to make the masala so that once you are done it will be perfect to bake them
4. In a pan heat 1 tsp oil and add the finely chopped onions and stir till they turn light brown, now add the turmeric, salt and pepper and stir well.
5. Cut the egg or you can put the entire egg in 1 puff, choice is yours. Cute the pasty onto a square shape and full it with just 1 spoon onion masala and place the egg in the center.
6. Try to fold the pastry diagonally and for the pastry to stick in the center just dab it with some egg wash or water.
7. do some egg wash on top of the pastry for some glossy finish, you could even add some sesame seeds on top for a perfect bakery effect.
8. place the pastry on a foiled tray and put it in a pre-heated oven at 180 degree/ fan grill or simply follow the instructions in the pack

Note :

- defrosting the puff pastry is necessary 
- let the masala and egg cool down before setting it in the oven, if its done when hot the pastry would be sticky and stretch 
- preheat oven and just follow the instructs in the puff pastry pack 


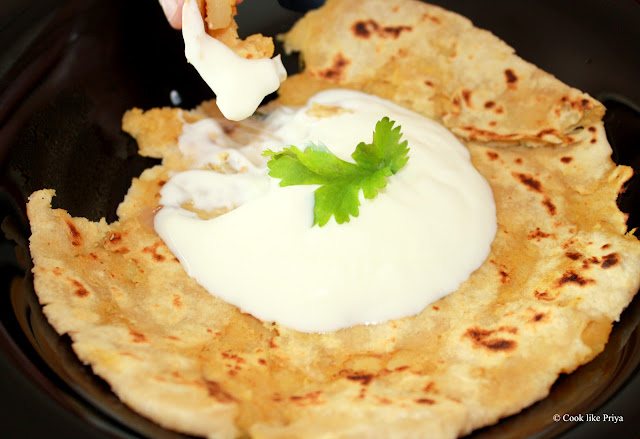
Aloo Paratha/ Stuffed Potato Roti ~ A Vegan special

One of my favorite dishes of all time is Aloo Paratha, tell me who doesn't like potatoes? I really wonder why all the good and tasty foods are not good for health... seriously Potatoes taste good and high in carbs and the best for of eating them is boiled/ mashed, but since my love of potatoes is endless, I started loving these stuffed rotis with potato mash which mum used to make for me. Miss those care-free days but now after marriage guess who loves it? my husband indeed... Though there are many differences among us like most couples, we have one distinct similarity and that is the love for FOOD ;-)


This recipe is once I adapted to our taste and we love to have it with curd and pickle. It is quite filling hence stick to small portions or if you are not calorie conscious and are gifted with a great physique come on tell me what needs to stop you? BINGE 
Prep & cooking time ~ 30 mins
Recipe Source ~ Own

Ingredients 

For Roti ~
Wheat Flour - 1.5 cup
Milk - for making the dough
Salt as per taste

For Potato Stuffing~
Potato - 1 large peeled & cut into quarters
Onion - 1 medium finely chopped
Green chilli - 2 finely chopped (optional, can be replaced with corriander)
Whole Jeera - 1 tsp
Ginger-garlic paste - 1 spoon
Red chilli powder - 1 tsp
Corriander - 1/2 tsp
Salt as per taste
Oil -2 tsp

Method 
  • In a pan, add water and bring it to a boil, add the potato. Let it cook for 5-7 minutes until soft
  • In a mixing bowl add the wheat flour and salt and mix well, combine milk little by little and start making a dough, make sure the dough is not sticky. keep it covered and set aside to be rolled later
  • Once the potatoes are soft discard the water and mash it. Don't over do it since you need some lumps 
  • In a non-stick pan add oil once its hot add the whole jeera and onions, let it sweat then add the ginger-garlic paste and green chilli, let it cook with a closed lid
  • now add the masalas and potato and let it combine and cook for 5 minutes, taste and check the spice and salt level
  • take the dough and mend it for 3 minutes and make thick rolls (approx double the size of the usual chappathi/roti rolls) now start to roll then when they are half-inch thick add the cooled potato masala around 1 spoon or lesser and fold the sides of the dough and form a ball
  • no start rolling them slowly and softly and make them flat
  • in a hot non-stick pan add oil and slide the roti into it and let it cook for 30 seconds and then flip them over and add oil, cook the other side
Serve hot with curd and pickle


Tips & Tricks


- It takes practice and so don't lose heart or over-do the rolling

Easy Fish Briyani


Last night, i was pondering what to do for lunch the next day... this happens almost every other night, just that someday's I get to realise that I have to cook only the previous night when I get to bed. Does this happen to you? There was once in Chennai where I had was surprised to see fish briyani in a restaurant in Adyar, I don't even remember the name. I wanted to try it, hence ordered it and it tasted so yum, ever since that I always wanted to try Fish Briyani at home and after like 3 years I took a chance and tried it on my own, I did not follow any recipe and it turned out great. I am not bragging about my cooking but give it a go and let me know if you feel the same.


Prep & Cooking Time ~ 25 minutes
Serves ~ 2
Recipe Source ~ own


Ingredients 


For Briyani ~
Onion - 1 large thinly sliced
Tomato - 1 large thinly sliced
Basmathi Rice - 1 cup
Water - 2-2.5 cups rice (go by your usual method)
Fish - 400 gms (any white fish, preferably boneless & skinless)
bay leaf - 1
Whole jeera - 1 tsp
Cloves - 2
Elaichi - 2
Star Anise - 1
Cinnomon - 1/2 inch stick
Giner-garlic paste - 1 spoon
Red chilli powder - 1 tsp
Corriander powder - 2 tsp
Turmeric Powder - 1/3 tsp
Pepper Powder (black) - 1/3 tsp
Garam Masaala - 1/4 tsp (optional)
Oil/ ghee - 3 spoons
Salt - as per taste


For Curd/ Yogurt Pachadi ~
Curd or yogurt - 1/2-1 cup
Onion - 1 medium thinly sliced
Corriander leaves - finely chopped
Salt - as per taste


Method 


For Briyani 


  • Wash the basmathi rice in cold water twice and sock in cold water and clean the fish 
  • In a pressure cooker/ heavy bottom vessel, heat oil/ghee and fry the whole spices one by one - bay leaf, cinnamon stick, elaichi, star anise, cloves and jeera
  • Add the onions and give it a give toss and wait until it turns brown
  • to this add the ginger garlic paste and tomato and let it cook for 2 minutes until the oil separates
  • add all the masala powders ans mix well, if you find the mixture getting dry add little water and add the fish (i used fish fillets-palm sized, i did not cut them into pieces), let them cook for 4 minutes until well cooked and mix them well, now you will find the fish getting separated naturally
  • add the basmathi rice, discarding the water in which it was soaked and add salt and necessary water for cooking
  • taste the water to check for spice and salt
  • close the lid and add the weigh, let it cook for 3-4 whistles or approximately 10 minutes in medium flame
  • Once done off the stove and let it simmer for another 5 minutes 
  • Serve alone with curd/yogurt chutney
For Chutney
  • In a bowl mix the yogurt/curd so that there are no lumps
  • Add the onions and corriander and mix well
  • Add salt as per taste

Related Posts Plugin for WordPress, Blogger...